Discover which search intents your content is missing — and use DFIRST's AI tools to build a gap map that turns blind spots into a content pipeline.

Research Node
Google SERP Scraper
Text Node
Claude Opus 4.7
Data Room
CSV File
You have a dozen published articles, solid traffic, and still no conversions from organic. Your pages are ranking — just not for the queries where people actually decide to buy. That's an intent gap. And it stays invisible until you go looking.
Most SEO audits flag missing keywords. Intent gap analysis goes a level deeper: it asks why people search, not just what they type. DFIRST's Research Node can pull, classify, and cluster intent signals at a scale that would take days manually. You get it done in one Whiteboard session.
This guide covers the full workflow — from your first seed keyword to a ranked gap report your content team can act on immediately.
KEY TAKEAWAYS
You will be able to map every intent variant for a target keyword — informational, navigational, commercial, transactional — using DFIRST's Research Node in a single session.
You will know which intent clusters your existing content does not cover, ranked by gap size and competitive opportunity.
You will have a structured intent gap report exported from your Whiteboard, ready to brief your content team or feed directly into a writing workflow.
What you're working with
Intent gap analysis is finding the search intents that exist in your niche but your content doesn't address. A gap isn't just a missing keyword. It's a missing reason to search.
DFIRST handles this through a chain of connected Nodes on a Whiteboard. Each Node does one job; the output of one feeds the next. For intent analysis, you'll use three node types:
Research Node — pulls live data from search engines, SERP features, People Also Ask boxes, and competitor pages, then returns structured results you can pipe forward.
Text Node — runs a language model over the Research Node's output to classify, cluster, and score intent signals against your existing content inventory.
AI Agent — handles multi-step reasoning. For bulk analysis, the Agent can loop through dozens of keyword variants on its own and surface patterns a single prompt would miss.
The Data Room is your persistent reference layer. Upload your content inventory before you start — the Text Node cross-references every intent signal against it to separate what you already cover from what you don't.
Before you start
Content inventory ready — export a list of your existing URLs and their target keywords. A CSV or TXT file with URL and keyword columns is enough.
Seed keyword list defined — know the 3–5 topics you want to analyze. Broad head terms work best as starting points (e.g., "project management software", "email marketing").
Data Room file uploaded — your content inventory must be in the Data Room before you open the Whiteboard. From the left sidebar, click Data Room → Documents, then drag and drop your file or click + Add Data.
A blank Whiteboard open — create a new Whiteboard or use an existing one with space for a 4-node chain. Switch to Canvas View using the toggle in the top right of the Whiteboard.
Step-by-step
1. Open a new Whiteboard and add a Research Node
Open DFIRST and navigate to your Whiteboard. Switch to Canvas View using the toggle in the top right.
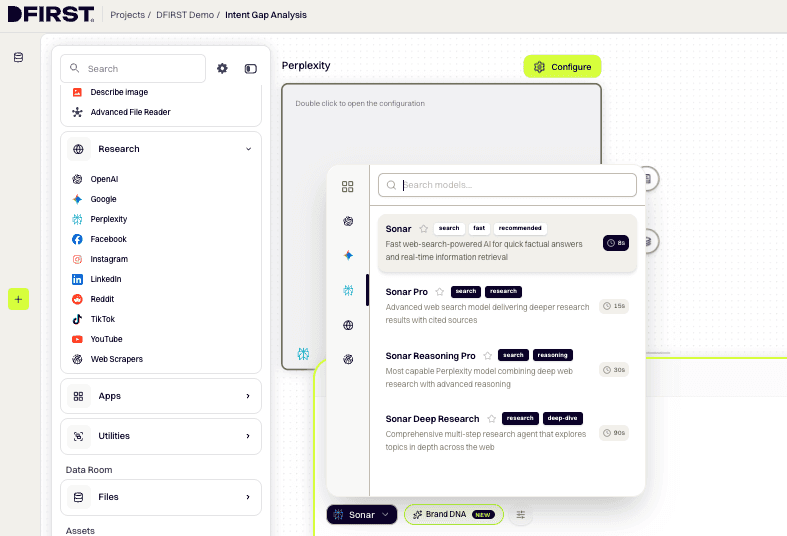
From the left toolbar, expand Tools → RESEARCH. Hover over your preferred research tool and click the + button that appears on the right:
Use Perplexity for a fast intent overview (facts, queries, citations)
Use Google Deep Research for a comprehensive multi-source analysis (10+ page dossier, reads papers, news, and reports)
The Research Node appears on the canvas.
Where to find it: Left toolbar → Tools → RESEARCH → hover over Quick Research or Deep Research → click +
2. Configure the Research Node for intent discovery
Click ⚙ Configure on the Research Node. In the prompt field, write a detailed instruction for what you want the research to return. Be specific about intent discovery:
Research the keyword "[your seed keyword]". Return:
A list of informational, commercial, navigational, and transactional
query variants for this topicPeople Also Ask questions and related searches
The top 10 ranking page titles and their apparent intent type
Any content gaps visible in the SERP (questions not well answered by
existing content)
Optional: Click the ⚡ Enhance prompt with AI icon in the config panel to expand and sharpen your instruction (~7–15 seconds).
Click Generate. The node returns a structured research report covering intent signals, query variants, and SERP observations for your topic.
Pro tip: Run one seed keyword per Research Node rather than stacking all five into one query. Separate nodes keep intent clusters clean and let you compare gap sizes across topics on the same canvas.
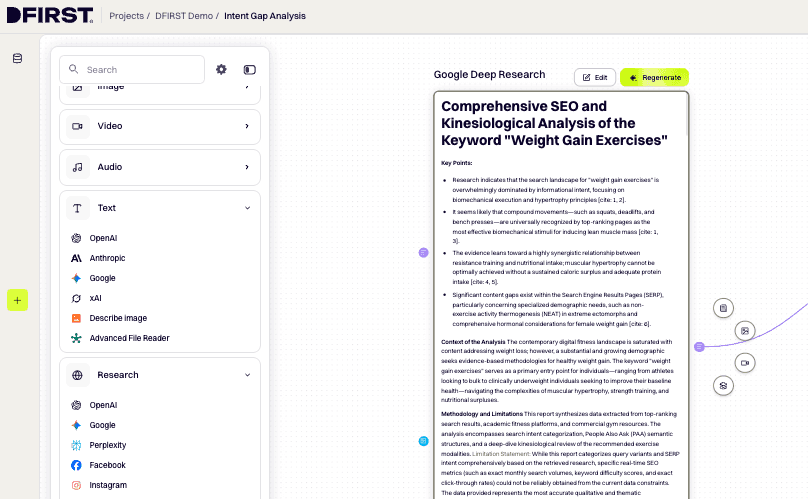
3. Review raw output
Scan the Research Node output before connecting the next node. You're looking for clusters — groups of queries that share the same underlying need. You don't need to classify them manually; that's the Text Node's job. But a quick scan now will tell you if the seed keyword was too broad and needs splitting.
4. Add a Text Node and connect it to the Research Node
From the left toolbar, expand Tools → TEXT, hover over your preferred provider (Anthropic or OpenAI recommended for classification tasks), and click +. The Text Node appears on the canvas.
Connect the nodes: Hover over the Research Node until connection points appear on its edges. Click and hold the right-side output point, drag the line to the left-side input point of the Text Node, and release. A connecting line appears and the Text Node turns white to confirm the connection.
Click ⚙ Configure on the Text Node. In the prompt field, paste your classification instruction:
Using the research provided, classify each intent signal as: Informational,
Commercial, Navigational, or Transactional. Then cross-reference against the
content inventory provided. For each intent cluster, output:
(1) intent type
(2) representative query
(3) coverage status — Covered, Partial, or Gap
(4) a gap severity score from 1–10
Because the Research Node is connected, the Text Node already has the full research output as context — you only need to write the instruction.
5. Add your content inventory from the Data Room
To give the Text Node a reference point for coverage scoring, add your content inventory file from the Data Room as a second upstream input.
In the left toolbar, expand the DATA ROOM section → Files → Main Folder. Hover over your content inventory file and click +. A Data Room input node appears on the canvas.
Connect it: Drag from the output point (right side) of the Data Room node to the input point (left side) of the Text Node — the same way you connected the Research Node. The Text Node now receives both the research output and your content inventory as context.
Without this step, the Text Node has no baseline — it will flag everything as a gap.

6. Run the Text Node and review the classified output
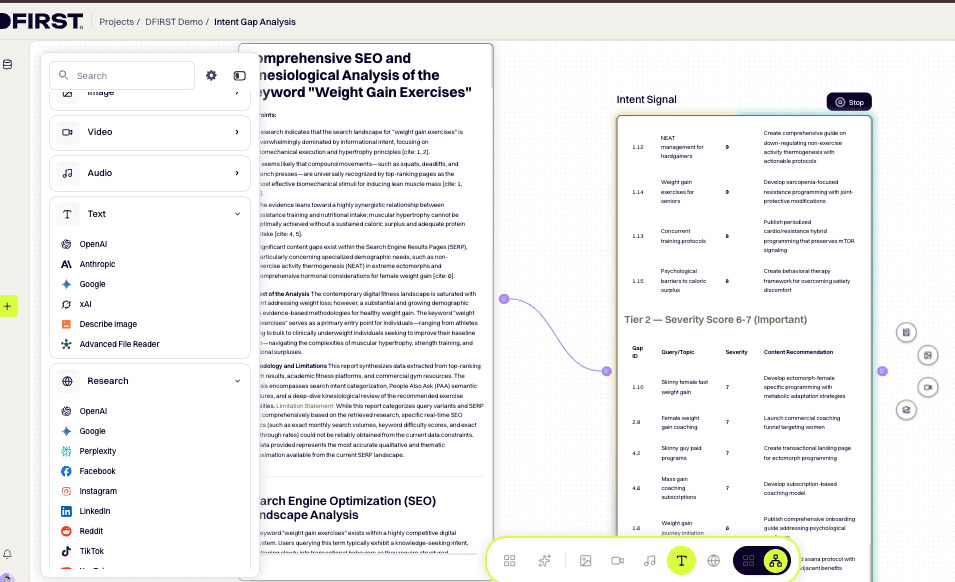
Click Generate on the Text Node. The output will be a structured breakdown: intent clusters sorted by type, with coverage status and gap severity scores.
Review the Gap rows first. A severity score of 7 or above means competitors are likely capturing that intent and your content isn't. Those are your priority targets.
Watch out: If every intent cluster comes back as "Gap" with uniformly high scores, your content inventory file may not have loaded correctly. Check that the Data Room node is connected to the Text Node via a visible connector line, then click Generate again.
7. Add a second Text Node to generate the gap report
Add another Text Node from the left toolbar (Tools → TEXT → hover over provider → click +). Connect it to the output of the classification Text Node.
Click ⚙ Configure and enter your report formatting instruction in the prompt field:
Using the intent classification provided, produce a prioritized gap report.
For each gap, include: gap name, intent type, recommended content format
(blog post, comparison page, FAQ, landing page), and a one-sentence brief.
Sort by gap severity score, highest first.
Click Generate. This node turns the classification analysis into a ready-to-brief document your content team can act on without interpretation.

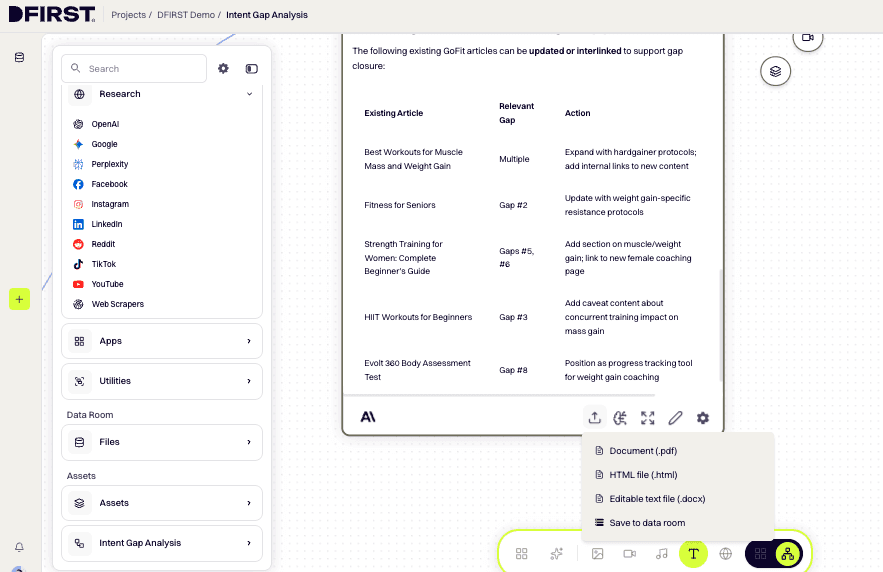
8. Export the gap report
When your gap report is ready, click the triple dots (…) in the top menu bar of the Whiteboard, then select Export. Choose DOCX for an editable document or PDF for a clean read-only version.
To make the report available for future DFIRST workflows, re-upload the exported file to your Data Room: Data Room → Documents → + Add Data → select your exported file. Once uploaded, any future node in any project can reference it as context.
Where to find it: Top menu bar → (…) → Export → choose format
Variations and alternate approaches
Simpler path — Single-node intent scan in Feed View
If you want a quick directional read without building a full node chain, open Feed View and run a single Research Node query with the prompt:
List the top informational, commercial, and transactional queries for [keyword]. Flag any cluster not commonly addressed by existing content.
You won't get coverage scoring, but you'll have a solid signal in under two minutes.
Advanced — AI Agent loop for bulk intent mapping
For analysis across multiple topics in one session, use the AI Agent instead of chaining nodes manually.
Click AI Assistant in the bottom toolbar. In the brief, describe the full task:
Run an intent gap analysis for the following seed keywords: [list keywords]. For each keyword, research intent variants, classify by type, and flag which clusters are likely underserved based on typical content patterns in this niche. Return a cross-topic priority matrix sorted by gap opportunity.
The Agent will propose a workflow, build the nodes, and generate across all topics in a single session. Review and confirm the proposed plan before it builds.
Why it matters
A content pipeline tied to real demand — every brief in your backlog is anchored to a documented intent gap, not an editor's guess.
Faster prioritization, fewer meetings — gap severity scores give your team an objective rank order. Sprint planning becomes a filter, not a discussion.
Current competitive data without a separate tool — DFIRST's Research Node pulls live SERP data, so you're working with what's ranking now, not a cached snapshot from months ago.
Cross-topic patterns visible in one place — running multiple seed keywords side by side on the same Whiteboard surfaces intent themes that repeat across topics. Those are often your best pillar content opportunities.
A reusable research artifact — once the gap report is in the Data Room, any team member can pull it, extend it, or wire it into a new writing workflow without rerunning the analysis.
Common issues and fixes
If the Research Node returns very thin output for your keyword: The topic may be too niche for a single broad query. Rewrite the prompt to be more specific, or add a second Research Node using the Reddit Scraper (Tools → RESEARCH → Reddit) to pull forum discussions and surface long-tail intent variants your audience actually uses.
If the Text Node's coverage classification looks wrong (e.g., articles you've published show as "Gap"): Check that your content inventory file's Data Room node is properly connected to the Text Node — look for a visible connector line between the two. If the connection is missing, add the Data Room node again and reconnect.
If gap severity scores cluster between 4–6 with no clear standout: The seed keyword is too broad. Break it into two or three tighter sub-topics and run a fresh Research Node for each. Narrower inputs produce sharper scores.
If the AI Agent stops mid-way through a bulk intent mapping run: Cut the number of topics in your brief and rerun. Describe the task more specifically so the Agent can complete it in fewer steps.
What to do next
Brief a content piece from your gap report — open a Text Node, connect your saved gap report from the Data Room as context, and prompt it to generate a full content brief for your highest-priority gap.
Build a content calendar from the priority matrix — feed the gap report into a Text Node configured to output a 90-day content calendar, with one piece per week ordered by gap severity.
Re-run the analysis after publishing — intent gaps close as you publish. Set a reminder to re-run this workflow 60 days after your first publishing sprint to measure coverage improvement and find the next layer of gaps.
Start your intent gap analysis today
You now have a repeatable system for replacing content guesswork with a ranked, evidence-based pipeline. DFIRST's Research and Text Nodes handle the heavy work — real-time web data in, prioritized gap report out. Run it once and your editorial planning changes for good.
Start for free → · See pricing

Share It On:
